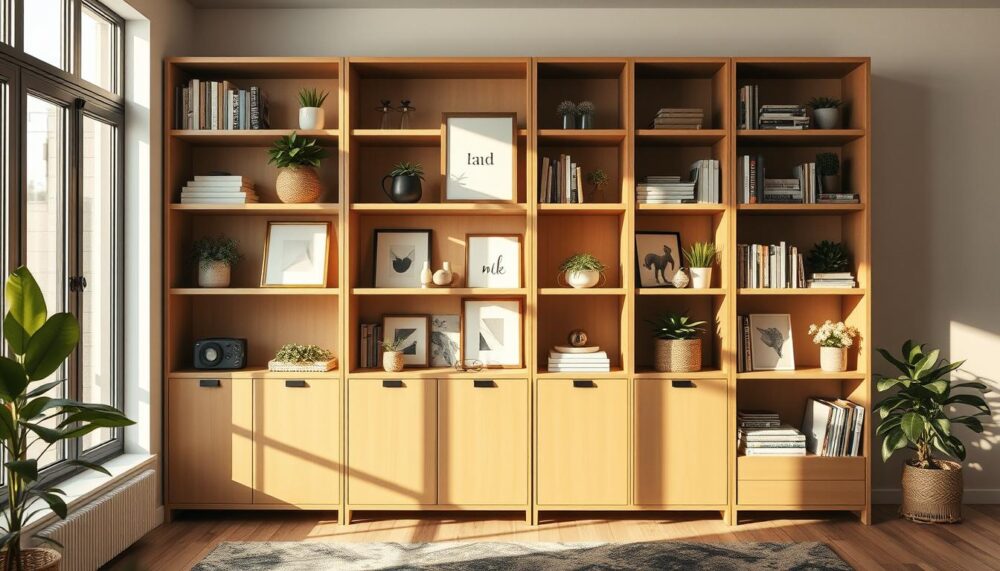
Looking for clever ways to upgrade your storage without breaking the bank? IKEA’s versatile shelving units offer the perfect foundation for creative DIY projects. The BILLY bookcase, for instance, has been a global favourite since 1979, selling one unit every five seconds. Its simple design makes it easy to customise, while recent sustainability upgrades—like replacing wood veneer with paper foil—add eco-friendly appeal.
With a little imagination, basic shelving can become anything from a built-in library to a hidden storage solution. Whether you’re after a sleek modern look or a rustic vibe, these hacks let you personalise your space affordably. Below, we’ll explore 14 inventive ideas to transform your plain unit into something extraordinary.
Key Takeaways
- IKEA’s bookcases are budget-friendly and highly adaptable for DIY projects.
- The BILLY model is a global bestseller, known for its simplicity and customisation potential.
- Recent updates include eco-conscious materials like paper foil instead of veneer.
- Hacks can turn basic units into stylish, personalised storage solutions.
- From hidden doors to built-in designs, creativity is the only limit.
Introduction: Unlocking the Potential of IKEA Bookcases
Why spend thousands when clever tweaks can give you a designer look for less? Custom built-ins often cost upwards of £5,000, but with a BILLY bookcase and a bit of creativity, you can achieve similar elegance for a fraction of the price. Take Mandi Johnson’s monochrome library project—her sleek, built-in aesthetic cost under £500 using IKEA’s modular units.
The rise of “IKEA hacking” has revolutionised home interiors. What started as a niche DIY trend is now a global movement, blending affordability with personalised design. Adjustable shelves and standardised sizes make these units a blank canvas for upgrades—whether adding crown moulding, LED strips, or bold paint.
“The beauty of hacking lies in turning mass-produced pieces into one-of-a-kind statements,” notes a London-based interior designer.
Key upgrades to explore:
You Might Also Like:


- Paint: Transform basic white into matte black or pastel hues.
- Lighting: Integrated LEDs add warmth and functionality.
- Moulding: Crown or baseboard trims create a bespoke finish.
With the right touches, even budget furniture can rival high-end alternatives. The next sections dive into step-by-step hacks to unlock this potential.
1. Create a Built-In Library with BILLY Bookcases
Dreaming of a cosy library but worried about the cost? With a few BILLY bookcases and basic tools, you can craft a high-end built-in look for less. This DIY project blends functionality with aesthetics, perfect for transforming blank walls into organised havens.
Materials You’ll Need
Gather these essentials before starting:
- 3/4″ plywood for structural support
- Lauan plywood and poplar boards for trim
- Shellac primer to prep surfaces
- Circular saw, nail gun, and carpenter’s square
Step-by-Step Assembly Guide
Begin by constructing a 2×4 base frame to elevate the units and ensure stability. Measure and cut plywood tops to fit snugly over the shelves.
Use a carpenter’s square to align vertical supports perfectly. Anchor the units to the wall behind future trim areas—this prevents wobbling and adds security.
“Position shelves before painting to avoid scrapes. It’s a small step that saves frustration later,” advises DIY enthusiast Mandi Johnson.
Finally, add crown moulding for a polished finish. This wood trim hides seams and elevates the design from basic to bespoke.
2. Add Crown Moulding for a Luxe Finish
A touch of crown moulding can turn flat-pack furniture into a designer statement. This simple upgrade adds architectural depth, making units look built-in. Opt for lightweight poplar or MDF—affordable yet durable choices that won’t overwhelm your shelving.
Precision is key. Compound-angle mitre cuts, like those Mandi’s dad tackled, require patience. “Watching him measure twice and cut once was nail-biting,” she admits. If angles intimidate you, hiring a carpenter ensures flawless results.
Once installed, use caulk to smooth joints for a seamless finish. Paint the moulding to match your shelves—this cohesion elevates the entire house style. The result? A high-end look that lasts for years.
“Crown moulding simplifies things by hiding seams. It’s the way to make modular pieces feel custom,” notes a UK-based renovator.
For a final flourish, add a slim trim along the base. This subtle detail ties the design together, proving that small touches create the biggest impact.
3. Paint Your Bookcase for a Personalised Touch
A fresh coat of paint can breathe new life into tired storage units. Whether you’re aiming for a bold statement or a subtle refresh, colour transforms basic shelves into cohesive décor. Mandi Johnson’s monochrome library, for instance, used Benjamin Moore’s Oil Cloth satin for a sleek, durable finish.
Choosing the Right Primer and Paint
Start with a shellac primer—it’s ideal for laminate surfaces. Mandi advises against spray-applied versions, as they can leave a dusty texture. Instead, use a brush and mineral spirits for easy cleanup.
For the topcoat, satin or semi-gloss paints work best. They’re scrubbable and resist wear, perfect for high-traffic areas. Here’s a quick comparison:
| Primer Type | Best For | Drying Time |
|---|---|---|
| Shellac | Laminate/wood | 1 hour |
| Latex | Painted surfaces | 2–4 hours |
Tips for a Flawless Finish
Prep is key. Sand the unit with 320-grit paper to help the primer adhere. Apply 2–3 thin coats, sanding lightly between layers.
Patience pays off. Let the paint cure for a week before stacking books or decor. “Rushing ruins the finish,” Mandi notes. With the right time and care, your shelves will look professionally upgraded.
4. Install LED Lighting for Ambience
Want to add a warm glow to your space without rewiring? LED strips under shelves highlight decor and improve visibility. It’s an easy way to make your unit feel curated and inviting.
Adhesive LED strips simplify installation—just peel and stick. For a seamless look, hide wiring behind lauan plywood backings. Warm-white LEDs (2700K) cast a cosy glow, perfect for living rooms or bedrooms.
Smart plugs take it further. Connect your lights to voice controls for hands-free operation. Uwe Christiaens’ BESTÅ hack proves how integrated lighting can redefine a room.
| LED Type | Colour Temp | Best For |
|---|---|---|
| Warm-White | 2700K | Relaxing spaces |
| Cool-White | 4000K | Task lighting |
“Lighting transforms the way we interact with spaces. It’s not just functional—it sets the mood,” notes a London design blogger.
Whether you’re highlighting books or art, LEDs offer a fuss-free way to elevate your storage. Just mind the cables, and you’ll have a polished look in no time.
5. Use Wallpaper or Decorative Backing
Give your shelving a fresh personality with creative backings. Wallpaper or painted panels instantly add depth and style to plain units. Farwa Moledina proved this with her scalloped wood trim, turning a basic piece into a vintage-inspired showstopper.
For renters, removable wallpaper like Spoonflower’s designs offers damage-free customisation. Simply measure, cut, and smooth out air bubbles for a polished finish. Geometric prints work particularly well for modern homes.
Prefer DIY patterns? Paint MDF panels with chevrons or florals before securing them with double-sided tape. Farwa’s hand-cut scallops demonstrate how organic shapes soften angular furniture beautifully.
“Backings transform shelves from functional to focal points. They’re the easiest way to make mass-produced pieces feel special,” says a Manchester-based stylist.
For cohesion, match your backing to room textiles. Here’s a quick guide to materials:
| Material | Best For | Installation |
|---|---|---|
| Removable wallpaper | Rental spaces | Peel-and-stick |
| MDF panels | Custom designs | Staples/adhesive |
| Lauan plywood | Painted finishes | Nails/glue |
Whether you choose bold prints or subtle textures, backings elevate storage into stylish displays. Just ensure patterns complement your room’s colour scheme for a pulled-together look.
6. Incorporate Glass or Fabric Doors
Glass or fabric doors aren’t just practical—they elevate your shelving into a design feature. IKEA’s HÖGBO doors, designed for the BILLY series, offer a sleek upgrade. Frosted glass adds a modern touch, while fabric panels hide clutter effortlessly.
For a polished finish, swap standard hinges for soft-close mechanisms. Katja Nordkvist’s KNOXHULT-BILLY hybrid cabinet proves how mixing styles creates standout furniture.
Prefer fabric? Stretch it over MDF panels for custom doors. This trick adds texture and ties into your room’s colour scheme. Whether you choose transparency or concealment, doors transform a basic piece into a curated display.
“Doors balance aesthetics and function. They protect books from dust while letting you showcase what matters,” notes a UK home stylist.
Key considerations:
- Glass: Ideal for displaying decor; frosted options diffuse light softly.
- Fabric: Use thick linen or cotton to prevent sagging.
- Hinges: Soft-close types prevent slamming—a small upgrade with big impact.
7. Build a Murphy Door for Hidden Storage
Ever wanted a secret storage solution that blends into your walls? A DIY Murphy door disguises shelves as seamless wall panels, perfect for tight spaces. Marc’s gangway project proves how a bookcase can double as a hidden entrance, adding intrigue to any room.

Key Steps for a Flawless Build
Start with heavy-duty pivots to support the door’s weight. Align the unit with existing trim to maintain its stealthy appearance. For a snug fit, add magnetic catches—they ensure the door stays closed without visible latches.
“The trick is making the bookcase look like part of the wall. Proper alignment hides the things you’d rather keep out of sight,” notes Marc, whose design saved space in his London flat.
| Pivot Type | Weight Capacity | Best For |
|---|---|---|
| Heavy-duty | Up to 50kg | Solid wood doors |
| Lightweight | Up to 25kg | Plywood/MDF doors |
This project works especially well in modern homes where space is limited. For more on space-saving hacks, explore our guide to optimising corner storage.
8. Combine Multiple Units for a Seamless Wall
Struggling to make the most of your wall space? Combining multiple shelving units creates a seamless, custom look. Mandi Johnson’s project used seven BILLY bookcases with 1×2 poplar strips to bridge gaps—proof that modular designs can feel bespoke.
Spacing and Alignment Tips
Start by mixing narrow and wide units for dynamic layouts. Uneven floors? Shim them before assembly to prevent wobbling. A laser level ensures shelves align perfectly across units, while trim or lauan plywood hides seams.
“The trick is treating separate pieces as one system. Proper spacing avoids a cluttered feel,” notes Philippe, who merged 10+ units in his living room.
Key steps for cohesion:
- Measure twice: Account for trim thickness when spacing units.
- Anchor securely: Wall-mounting prevents shifting over time.
- Paint uniformly: Matching colours unify the design.
Whether you’re building a library or media wall, this way of joining units maximises both style and function. For larger projects, Philippe’s hack shows how scale doesn’t sacrifice elegance.
9. Add Scalloped Wood Trim for a Vintage Vibe
Bring a touch of nostalgia to your shelving with hand-cut scalloped edges. Farwa Moledina’s DIY project showcased how this wood trim can turn a basic piece into a charming focal point. The soft curves add warmth, perfect for cosy homes or eclectic spaces.
Start by sketching your desired curves onto MDF panels. A jigsaw makes light work of cutting precise shapes. Remember to prime raw edges—this prevents swelling and ensures a smooth finish.
“Contrasting paint colours highlight the scallops beautifully. Pair them with brass handles for a retro twist,” suggests Farwa.
For a cohesive look, consider these finishing touches:
- Paint: Try sage green against white for subtle contrast
- Hardware: Antique brass knobs complement the vintage aesthetic
- Styling: Display ceramic vases or leather-bound books to enhance the theme
This furniture upgrade proves that small details create big impact. Whether you’re aiming for cottagecore or mid-century modern, scalloped edges add personality to any room.
10. Customise with Drawers and Cabinets
Closed cabinets offer a sleek solution for hiding everyday mess. IKEA’s OXBERG drawers seamlessly fit BILLY units, adding hidden storage without sacrificing style. Perfect for those who prefer tidy surfaces but need quick access.
For smooth operation, measure drawer slides precisely. A millimetre’s misalignment can cause jams. Claire, a London-based renovator, swears by velvet-lined inserts: “They protect delicate jewellery and reduce noise—game-changers for small accessories.”
“Mixing open shelves and closed compartments creates balance. It’s the best of both worlds—display and concealment.”
Her piece combined OXBERG drawers with glass-fronted cabinets, proving versatility wins. Brass tag holders add a polished touch for labelled organisation.
| Drawer Lining | Best For | Maintenance |
|---|---|---|
| Velvet | Jewellery, watches | Spot clean |
| Bamboo | Utensils, stationery | Wipeable |
Whether upgrading a home office or bedroom, this furniture hack blends practicality with aesthetic finesse. Just remember: precision measurements ensure flawless function.
11. Transform into an Entertainment Centre
Your shelving can do more than hold books—it can become the heart of your media setup. With a few clever tweaks, those shelves can house everything from gaming consoles to sound systems, keeping your space tidy and stylish.

Adapting Shelves for Tech and Media
Start by measuring your devices to ensure a perfect fit. Mandi’s custom boxes on lower shelves kept AV equipment organised while maintaining a sleek look. Here’s how to achieve similar results:
- Drill cable holes in back panels for tidy wiring—no more tangled mess.
- Adjust shelf heights to accommodate gaming consoles or speakers snugly.
- Use heat-resistant materials near electronics to prevent damage.
For added flair, integrate Bluetooth speakers like Mandi’s Amazon model. Pair them with LED backlighting for a cinema-worthy ambiance. Soft white strips behind the unit reduce glare during movie nights.
“The right layout turns chaotic tech into a streamlined display. It’s the best way to merge function with modern style.”
Remember to leave space for ventilation around heat-sensitive things. A well-planned setup ensures your entertainment centre looks polished while performing flawlessly.
12. Create a Playroom Storage Solution
Tired of tripping over toys? Clever storage can turn chaos into order. One family transformed their play room using labelled bins and adjustable shelves, proving that even the messiest things can be tamed.
Start by mounting units at child height. Little ones can access their favourite toys independently, fostering tidiness. Wipeable PVC wallpaper on backings handles sticky fingers—a lifesaver for busy families.
“Assigning shelves by activity—like crafts or puzzles—teaches kids organisation in a fun way,” notes a parent from Manchester.
For flexibility, add casters to base units. Mobile storage adapts as play needs change. Just remember to anchor top-heavy shelves to walls for safety—durable solutions should last years.
- Child-friendly: Low shelves encourage independence.
- Wipe-clean: PVC backings survive glitter and glue.
- Adaptable: Casters let you reconfigure spaces easily.
13. Hack a Circular Bookcase for Unique Appeal
Round shelving units break the mould, offering a fresh take on traditional storage. IKEA’s circular designs can double as striking wall art when mounted creatively. This DIY project transforms functional wood into a conversation-starting display.
For maximum impact, cluster three or more units together. Staining inner rings darker than the frame adds depth—try walnut for warmth against light oak. Secure each piece with sturdy L-brackets, ensuring they’re level for a polished finish.
“Circular shelves challenge expectations. They’re sculptural yet practical—perfect for showcasing curated collections.”
Style them thoughtfully:
- Plants: Trailing ivy softens geometric lines
- Ceramics: Hand-thrown pots add organic texture
- Books: Stack horizontally to follow the curve
Pair with a mid-century sofa like Article’s Burrard for cohesive retro flair. The circular shapes echo period design while keeping your space current.
14. Upcycle with Sustainable Materials
Sustainable materials can transform ordinary shelving into eco-conscious statements. IKEA’s BILLY range now uses paper foil instead of veneer—a greener choice that doesn’t sacrifice style. With a few thoughtful tweaks, your project can reduce waste while elevating your home.
Start by sourcing reclaimed wood from demolition sites for trim or accents. Sanded and sealed, it adds rustic charm without new resources. Pair it with non-toxic, water-based paints—low in VOCs and kinder to indoor air quality.
“Upcycling isn’t just about aesthetics; it’s a way to honour materials’ histories,” says Malcom Begg, whose reclaimed-wood BILLY hack went viral.
Small details make a big impact:
- Recycled glass knobs: Etsy artisans craft these from post-consumer bottles.
- Fabric scraps: Line shelves with leftover textiles for pops of colour.
- Bamboo organisers: A renewable alternative to plastic dividers.
| Material | Eco-Benefit | Best Use |
|---|---|---|
| Reclaimed wood | Reduces deforestation | Trim, shelves |
| Water-based paint | Non-toxic fumes | Finishing |
| Recycled glass | Diverts waste | Hardware |
Whether you’re refinishing a single unit or tackling a wall-sized project, sustainable choices future-proof your design. As Malcom proves, ethical upgrades needn’t compromise on beauty—just creativity.
Conclusion: Your IKEA Bookcase, Your Masterpiece
Turn everyday storage into a personalised masterpiece with simple DIY tweaks. Mandi’s monochrome library proves it—her week-long paint project saved thousands compared to custom furniture. Start small: a bold colour or LED strips can redefine your space without complex tools.
Need inspiration? Platforms like IKEA Hackers showcase inventive upgrades. Remember, patience pays—allow primers and paints to cure fully for a flawless finish.
Ready to begin? Share your creation with #DIYKinfolk. Whether it’s a painted accent or a full built-in, your home deserves a unique touch.
FAQ
Can I turn my BILLY bookcase into a built-in library?
Absolutely! With some trim, paint, and clever placement, you can create a seamless built-in look. Just ensure proper anchoring to the wall for stability.
What’s the best way to add a luxe finish to my shelves?
Crown moulding instantly elevates the look. Choose a style that matches your décor, and secure it with adhesive or nails for a polished finish.
How do I paint my bookcase without streaks?
Start with a primer, then use a high-quality brush or roller for even coverage. Light, smooth strokes help avoid drips and streaks.
Can I install LED lighting myself?
Yes! Stick-on LED strips are easy to apply. For a cleaner look, hide wires behind the shelves or use battery-operated options.
What’s the easiest way to personalise the backing?
Wallpaper or adhesive vinyl adds instant charm. Measure carefully, apply smoothly, and trim excess for a professional touch.
How do I add doors to my unit?
Glass or fabric doors can be fitted using hinges. For a sleek look, consider pre-made inserts or custom-cut panels.
Can I create hidden storage with a Murphy door?
Yes! A DIY Murphy door hides shelves behind a functional door. Ensure proper hinges and alignment for smooth operation.
What’s the trick to combining multiple units seamlessly?
Align them side by side and use matching trim. A uniform paint colour ties everything together for a cohesive appearance.
How can I give my shelves a vintage feel?
Scalloped wood trim adds character. Sand and stain it to match your unit for a charming, old-world effect.
Can I integrate drawers into my bookcase?
Yes! Pre-made drawer inserts or custom-built units can be added. Ensure proper measurements for a snug fit.
How do I adapt shelves for an entertainment centre?
Adjust shelf heights to fit media components. Cable management clips keep wires tidy, and open-back designs improve ventilation.
What’s the best way to upcycle with sustainable materials?
Use reclaimed wood or eco-friendly paint. Repurposing old furniture parts also reduces waste while adding unique flair.