For over four decades, one particular piece of furniture has captured the hearts of design enthusiasts and savvy homeowners. Its simple design and incredible affordability make it a perfect starting point for creative projects.
With a new unit sold every few seconds since its launch, this item has achieved cult status. It offers a brilliant way to achieve a high-end, custom look without the hefty price tag of bespoke joinery.
Starting from just £39 and available in five colours, it adapts beautifully to any interior style. With some planning and a bit of creativity, you can transform your space.
This guide will show you how to create sleek, built-in storage that maximises your room’s potential. Let’s explore how to turn this humble unit into a stunning feature.
Key Takeaways
- The Billy is an incredibly versatile and affordable piece of furniture.
- It has been a popular choice for over 40 years among DIY lovers.
- Hacking this item is far more cost-effective than custom-made options.
- Available in multiple colours, it can suit various design aesthetics.
- These projects can greatly enhance storage and room aesthetics.
- Expert insight confirms its potential for luxurious transformations.
- With some creativity, you can achieve a professional, built-in look.
Why Consider an IKEA Billy Bookshelf Hack?
Many homeowners dream of custom-built storage but hesitate at the cost. This is where creative solutions shine. Transforming affordable flat-pack furniture offers incredible value.
These projects deliver luxury looks without bespoke prices. You achieve tailored storage that fits your space perfectly. The satisfaction of creating something unique adds to the appeal.
You Might Also Like:


British homes often need smart space solutions. Maximising every inch matters in smaller rooms. Built-in units provide both function and style.
Interior experts recognise this trend’s growing popularity. Sam Sutherland of Flitch comments:
“These transformations demonstrate how accessible good design can be. With some creativity, anyone can achieve professional results.”
The versatility of these units makes them ideal for various spaces. From living areas to home studies, they adapt beautifully. You can create anything from media centres to library walls.
Many have shared their success stories online. TikTok creators and homeowners show stunning results. Their projects prove what’s possible with basic units and imagination.
Starting your project requires careful planning. Measuring your space comes first. Choosing the right configuration ensures the best outcome.
| Solution Type | Average Custom Cost | Hack Project Cost | Savings Percentage |
|---|---|---|---|
| Wall-to-wall library | £2,500-£4,000 | £300-£600 | 85% |
| Media console unit | £1,200-£2,000 | £200-£400 | 80% |
| Home office storage | £800-£1,500 | £150-£300 | 81% |
Even beginners can achieve impressive results. The right guidance makes the process straightforward. You’ll create a personalised statement piece that enhances your daily life.
Imagine guests admiring your sophisticated storage solution. They’ll never guess it started as basic flat-pack furniture. The emotional reward matches the practical benefits.
Planning Your Billy Bookcase Transformation
The foundation of any impressive built-in storage solution lies in careful initial planning and measurement. Taking time at this stage ensures your final result looks professional and fits perfectly within your available area.
Measuring Your Space Accurately
Precise measurements are absolutely crucial for achieving that seamless, custom look. Start by measuring the full width of your intended wall space from end to end.
Don’t forget to measure ceiling height too. This determines whether standard or extended height units will work best. Note any obstructions like skirting boards, radiators, or light switches that might affect placement.
Sam Sutherland of Flitch Interiors emphasises:
“Always measure twice and cut once. This old carpenter’s adage holds true for these projects – careful planning prevents costly mistakes and ensures a polished finish.”
Use a quality tape measure for accuracy. Many find laser measures or level apps helpful for checking surfaces are truly vertical. Record all dimensions clearly in a notebook or digital document.
Choosing the Right Billy Bookcase Units
With measurements complete, you can select the perfect combination of units for your space. Consider both function and aesthetics when making your choices.
Standard height pieces work well for most applications. The low version creates excellent sideboards or media consoles. Narrow units offer flexibility for filling gaps or creating interesting arrangements.
Think about how you’ll use the storage. A home office might need different configurations than a living room library. Consider whether you want open shelving or prefer adding doors later.
Sketch your layout considering visual balance and accessibility. Will the arrangement be symmetrical? How will you access items on higher shelves? Account for any trim or moulding that might affect final dimensions.
This thoughtful approach allows for future flexibility too. You can always reconfigure units if your needs change. Good planning now makes the execution phase much smoother and more enjoyable.
Essential Tools and Materials You’ll Need
Gathering the right equipment before starting makes your project smoother and more enjoyable. Quality materials ensure your finished piece looks professional and lasts for years.
Having everything organised saves time and reduces stress. You’ll feel more confident tackling each step with proper preparation.
Primers and Paints for Furniture
Special primer is essential for painting laminate surfaces. It creates a proper base for your chosen colour to adhere to.
Sam Sutherland advises:
“Never skip the priming stage with these surfaces. Proper preparation prevents peeling and ensures a flawless finish that lasts.”
Rust-Oleum’s Surface Primer works brilliantly on melamine. It’s available through Amazon and most UK hardware stores.
Choose durable paint types for furniture projects. Satin or eggshell finishes offer both beauty and practicality.
Select a colour that complements your room’s decor. Test samples on a spare piece before committing.
Wood Trim, Moulding, and Additional Supplies
Architectural details transform basic units into custom-looking storage. MDF panels and crown moulding add character.
Trim pieces hide joins between units beautifully. They create that built-in appearance everyone desires.
Consider these essential supplies:
- Drill, hammer, saw, measuring tape, level, and sandpaper
- Screws and brackets for securing units to walls
- Wood glue and filler for seamless joins
- Custom handles or knobs for luxury finishing touches
Invest in quality materials rather than cheaper alternatives. They make a noticeable difference in your final result.
Most items are available at local DIY stores or online retailers. Planning ahead ensures you have everything when needed.
| Material Type | Purpose | Recommended Brands | Approximate Cost |
|---|---|---|---|
| Melamine Primer | Surface preparation | Rust-Oleum | £12-£18 |
| MDF Moulding | Architectural detailing | Wickes, B&Q | £8-£15 per length |
| Furniture Paint | Finishing coat | Farrow & Ball, Dulux | £20-£40 per tin |
| Custom Hardware | Luxury enhancement | Ironmongery Direct | £3-£12 per handle |
These materials prepare you for the assembly and painting stages. The right tools make achieving professional results much easier.
Your transformed storage solution will become a cherished part of your home. The effort invested now pays dividends in both function and style.
How to Execute the Perfect IKEA Billy Bookshelf Hack
Bringing your vision to life requires a methodical approach and attention to detail. Following a clear sequence ensures your finished piece looks professional and functions beautifully.
Begin by assembling your units according to the manufacturer’s instructions. Take your time during this stage to guarantee everything is square and stable.
Position the pieces against your wall in the planned configuration. Use a spirit level to check they’re perfectly vertical and aligned.

Securing the structure properly is crucial for safety and longevity. Fix each unit to the wall using appropriate brackets and screws.
Join adjacent cabinets together for a unified appearance. Metal connectors or wood screws work well for creating one solid piece.
Caroline McQuistin’s stunning library transformation demonstrates what’s possible. Her approach shows how patience and precision deliver outstanding results.
“The moment everything clicks into place is incredibly rewarding. Seeing separate units become one cohesive structure makes all the effort worthwhile.”
Adding trim and moulding elevates the basic framework to custom-looking storage. Measure each section carefully before cutting your pieces.
Use wood adhesive and finishing nails to attach moulding securely. Fill any gaps with decorator’s caulk for a seamless finish.
Consider these essential steps for painting:
- Lightly sand surfaces to help primer adhesion
- Apply specialist primer for laminate surfaces
- Allow proper drying time between coats
- Use quality brushes for smooth, streak-free results
Working efficiently saves time and reduces frustration. Organise your tools and materials before starting each phase.
Larger projects often benefit from an extra pair of hands. Some steps, like holding trim in place, are easier with assistance.
Always prioritise safety when using power tools. Wear protective equipment and follow manufacturer guidelines carefully.
The final reveal makes every moment spent worthwhile. You’ll create a beautiful feature that enhances your daily life.
Take pride in your accomplishment and enjoy your transformed space.
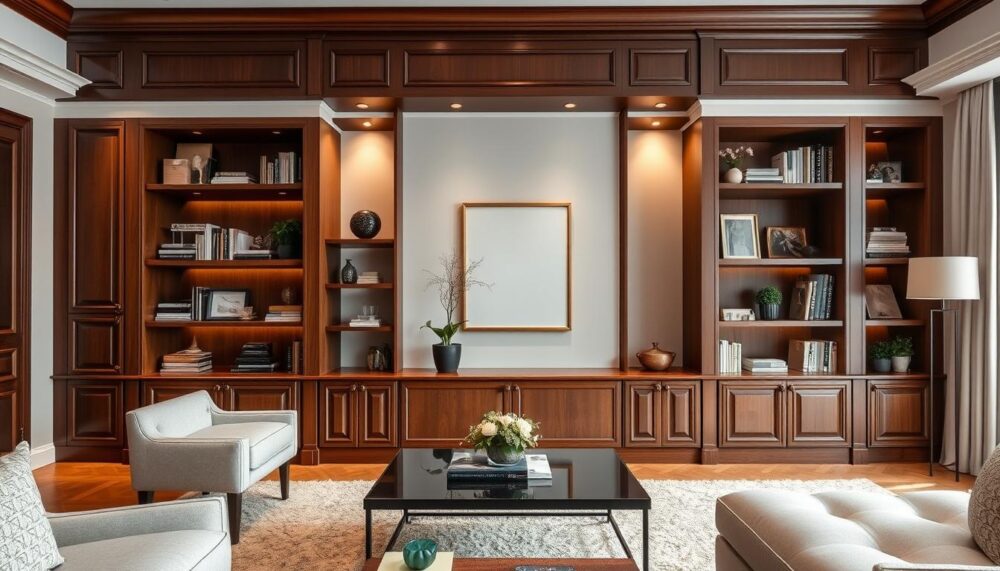
Creating a Built-In Library Look
Wall-to-wall shelving creates an impressive display while maximising your room’s storage potential. This approach turns ordinary walls into extraordinary features that blend style with practicality.
Careful arrangement transforms separate pieces into one cohesive unit. The result feels custom-designed for your space rather than store-bought.
Attaching Multiple Units for a Seamless Effect
Begin by positioning your units along the entire wall space. Ensure they sit flush against one another without gaps.
Secure each cabinet to the wall using appropriate brackets. This prevents movement and creates a stable structure.
Join adjacent units together using wood screws or metal connectors. This makes them function as one continuous piece rather than individual items.
Sam Sutherland recommends:
“Use real wood trim between units for the most polished result. This attention to detail separates amateur attempts from professional-looking installations.”
Adding Trim and Moulding for a Luxe Finish
MDF panels and crown moulding hide seams beautifully. They add architectural interest that elevates basic units.
Baseboards along the bottom create a grounded appearance. Crown moulding along the top completes the built-in illusion.
Measure each section carefully before cutting trim pieces. Use wood adhesive and finishing nails for secure attachment.
Fill any small gaps with decorator’s caulk. This creates seamless transitions between different elements.
Painting techniques help blend the structure with your walls. Choose colours that complement your room’s existing scheme.
Fresh blue shades often enhance the luxury feel. They create depth while maintaining a timeless aesthetic.
Practical benefits include increased storage capacity for books and decorative items. The arrangement also elevates the entire room’s aesthetics.
Consider varying shelf heights within your configuration. This accommodates different item sizes from large art books to small ornaments.
Caroline McQuistin’s transformation demonstrates the incredible impact possible. Her project inspires through its professional finish and clever design.
Patience during installation yields the best results. Allow adequate time for each stage rather than rushing the process.
Your completed library will become a cherished feature. It combines practical storage with beautiful display opportunities.
Incorporating Doors for a Sophisticated Style
Adding doors transforms basic storage into elegant furniture with concealed organisation. This upgrade brings a polished finish that elevates your entire room’s aesthetic.
Glass-fronted options allow you to showcase decorative items while keeping them dust-free. They create a curated display that feels both personal and professional.

Selecting and Fitting Glass Doors
Choose doors that match your unit’s dimensions perfectly. Measure the opening carefully before purchasing to ensure proper alignment.
Installation requires attention to detail for smooth operation. Follow the manufacturer’s instructions for hinge placement and adjustment.
Yvonne Fisher demonstrated how effective this can be. She used Farrow & Ball’s Faded Terracotta with custom handles for stylish tableware storage.
Her project shows how colour coordination creates harmony with room decor. The result feels intentionally designed rather than added later.
Updating Hardware with Custom Handles
Replacing standard handles makes a significant impact on the overall look. Choose designs that complement your room’s style period.
Matte black or brass finishes add contemporary elegance. They provide a luxury feel without the high cost of custom cabinetry.
Consider these popular hardware options:
- Brass cup handles for traditional interiors
- Minimalist bar pulls for modern spaces
- Ceramic knobs for rustic charm
- Leather pulls for industrial aesthetics
Installation is straightforward with basic tools. Ensure screw lengths match your door thickness for secure fitting.
Interior customisation increases functionality dramatically. Add adjustable shelves, rails, or hooks to organise contents perfectly.
The benefits extend beyond mere appearance. You gain protected storage that maintains its beautiful presentation effortlessly.
This approach works wonderfully in dining rooms or living areas. It keeps frequently used items accessible yet neatly contained.
Even DIY beginners can achieve professional results. The process requires patience rather than advanced skills.
Your finished piece will become a cherished feature of your home. It demonstrates how thoughtful details create luxury living spaces.
Painting Your Billy Bookcase to Match Your Decor
The finishing touches through paint transform your project from functional to fabulous. This stage allows complete personalisation, ensuring your new storage solution harmonises perfectly with your existing room scheme.
Priming Melamine Surfaces Effectively
Proper surface preparation makes all the difference for a durable finish. Melamine requires specialist primer to ensure paint adheres properly and doesn’t peel over time.
Sam Sutherland emphasises this crucial step:
“Never underestimate the importance of priming. This foundation work separates temporary solutions from professional-looking finishes that last for years.”
Rust-Oleum’s Surface Primer works excellently on these surfaces. Available through Amazon and most UK DIY stores, it creates the perfect base for your chosen colour.
Before priming, lightly sand surfaces with fine-grit sandpaper. This helps the primer bond more effectively to the smooth surface.
Choosing the Perfect Colour Palette
Your colour selection should complement your room’s existing decor while creating the desired atmosphere. Consider both the natural and artificial lighting in your space.
Dark, sophisticated shades like Benjamin Moore’s Yorktowne Green create cosy, intimate spaces. Lighter tones can make smaller rooms feel more open and airy.
Many successful projects use Farrow & Ball’s beautiful earthy tones. These colours add depth and character while maintaining elegance.
Consider these popular approaches:
- Colour-matching to existing walls for seamless integration
- Soothing blues for calm, library-like atmospheres
- Vibrant terracottas for Mediterranean-inspired warmth
- Neutral tones for flexible, timeless appeal
Sherry Ou’s transformation demonstrates how colour completely redefines a piece. Her project shows the dramatic potential of careful colour selection.
Always test your chosen shade on a small, inconspicuous area first. Observe how it looks at different times of day under varying light conditions.
The painting process itself requires patience for best results. Apply multiple thin coats rather than one thick layer for a smooth, professional finish.
Choose your application method based on desired texture. Brushes work well for detailed areas, while rollers cover larger surfaces quickly.
Your completed piece will become a cohesive part of your room’s design. The right colour choice elevates basic storage into a stylish furniture feature.
This attention to detail creates that custom, built-in look everyone desires. Your transformed storage will look like it was always meant for your space.
Building a Stylish Sideboard from a Billy Bookcase
Creating a multifunctional sideboard from basic shelving units unlocks new possibilities for room design. This clever approach transforms vertical storage into elegant horizontal furniture that serves both practical and decorative purposes.
Start with a narrow unit placed on its side to achieve the perfect sideboard height. This repositioning creates an ideal base for adding a beautiful worktop that completes the transformation.
Choose quality timber like oak or plywood for your new surface. Have it cut to size at your local timber merchant for a perfect fit that gives a professional finish.
Dalia Aly’s brilliant TikTok demonstration shows how dramatic this change can be. Her project proves how basic units become unrecognisable through thoughtful modification.
Consider different door options to suit your style preferences. Solid panels offer concealed storage while rattan inserts provide texture and visual interest.
The practical benefits make this project worthwhile. You gain valuable surface space for displaying ornaments or serving drinks while maintaining organised storage underneath.
Follow these essential steps for success:
- Secure the unit to the wall for stability and safety
- Attach your chosen worktop using strong adhesive and screws
- Update doors and hardware for a cohesive look
- Add decorative touches that reflect your personal style
Select colours that complement your existing decor scheme. Matching your new sideboard to other furniture creates harmony throughout the space.
This versatile approach works beautifully in various rooms beyond the living area. Consider it for dining spaces, hallways, or even bedroom storage solutions.
The cost savings compared to buying new furniture are significant. You achieve a custom look for a fraction of the price of ready-made alternatives.
Get creative with materials for a unique finish. Leftover wood from other projects or vintage handles from antique markets add character and charm.
Your transformed piece will become both functional and fashionable. It demonstrates how imagination turns basic units into something truly special for your home.
Designing a Customised Home Office Storage Solution
Working from home demands smart organisation that combines function with style. A clever approach involves combining different furniture pieces into one seamless unit.
This creates a dedicated workspace that feels both professional and personal. You can achieve this without spending a fortune on custom cabinetry.
Start by selecting a low shelving unit and pairing it with a dresser of matching height. This combination forms the perfect foundation for your desk area.
Ensure both pieces align perfectly along their top edges. Use a spirit level to check they sit flush before securing them together.
Sherry Ou’s brilliant transformation demonstrates this technique beautifully. She used a calming blue paint to unify the separate components.
Her project shows how colour creates cohesion between different elements. The result looks like one purpose-built piece rather than assembled components.
Customise your storage to suit specific needs. Adjust shelf heights to accommodate files, reference books, or office supplies.
Consider adding dividers or organisers inside drawers. These keep smaller items neatly arranged and easily accessible.
Cable management makes your setup look tidier and works more safely. Drill discreet holes in the back panel for wires to pass through.
Use adhesive clips or channels to gather loose cables together. This prevents tangled cords from cluttering your workspace.
The ergonomic benefits are significant. You can tailor the height and layout to your personal comfort.
This creates a healthier working environment that reduces strain. Your productivity often improves with a well-organised space.
Colour choices influence mood and concentration. Soft blues promote calm focus while neutral tones create a clean, professional backdrop.
Consider your room’s existing decor when selecting shades. Matching your new unit creates harmony throughout the space.
This solution saves valuable floor area in smaller rooms. It maximises vertical storage without overwhelming the available space.
Even corners become useful with this clever configuration. You gain a functional workstation that doesn’t dominate the room.
Personal touches make the space truly yours. Add decorative items, plants, or personalised organisers.
These finishing touches transform practical storage into an attractive feature. Your home office becomes somewhere you enjoy spending time.
The final appearance is both stylish and highly functional. Guests will admire your professional-looking setup.
They’ll never guess it started as separate flat-pack furniture. The satisfaction comes from creating something perfectly suited to your needs.
Crafting a Playful Shelving Den for Children
Transforming ordinary furniture into magical spaces captures children’s imaginations wonderfully. This clever approach combines practical storage with creative play areas in one delightful piece.
Using two low-height units creates the perfect foundation. Position them parallel to form the sides of your den structure. Their sturdy construction provides excellent support for the playful canopy.

Drape a colourful sheet or lightweight fabric across the top. This creates that beloved tent-like effect children adore. Secure it properly to ensure safety during enthusiastic play sessions.
Ideal Home magazine featured this brilliant concept recently. Their example demonstrates how simple yet effective this transformation can be. It proves luxury play spaces needn’t cost a fortune.
“This ingenious solution offers the perfect blend of organisation and imagination. Children gain both accessible storage and their own special retreat.”
The benefits extend far beyond mere appearance. Children learn organisation skills through accessible toy storage. Their creativity flourishes within this personalised play space.
Safety remains absolutely paramount. Always secure units firmly to the wall to prevent tipping. Choose child-friendly materials and avoid sharp edges throughout your project.
Bright, cheerful colour schemes work wonderfully for children’s spaces. Consider their favourite hues when selecting paints and fabrics. This personal touch makes the den truly theirs.
Personalisation options add extra magic. Name plaques, fairy lights, or themed accessories create special memories. Children love contributing ideas during the decoration process.
This versatile solution adapts to various rooms beautifully. It maximises space usage in bedrooms or dedicated playrooms. The compact footprint makes it ideal for smaller homes.
Assembly proves surprisingly straightforward for most families. You can complete this enjoyable project over a single weekend. The results bring immediate joy to little ones.
Involving children in decorating fosters creativity and ownership. They take pride in their customised retreat. This engagement makes the space even more special for them.
The final creation becomes a cherished part of family life. It provides years of enjoyment and practical organisation. Children develop fond memories of their magical den.
| Aspect | Consideration | Recommendation | Approximate Cost |
|---|---|---|---|
| Base Units | Stability and height | Low-height models | £80-£120 |
| Canopy Material | Durability and safety | Lightweight cotton | £15-£30 |
| Wall Fixings | Child safety | Heavy-duty brackets | £10-£20 |
| Decor Elements | Personalisation | Themed accessories | £20-£50 |
This delightful hack demonstrates how simple ideas create the most wonderful spaces. For more inspiring children’s room solutions, explore these creative bookcase transformation ideas.
The joy on children’s faces makes every moment spent worthwhile. You create not just storage, but cherished childhood memories.
Achieving an Arched Look for a Modern Twist
Contemporary interiors increasingly embrace curved forms to soften modern spaces. This organic design trend brings warmth and movement to furniture pieces.
Applying arches to basic units creates a unique look that feels both current and timeless. The curved elements transform angular profiles into flowing statements.
Melanie Boyden’s remarkable transformation shows what’s possible. Her four-week project saved over £10,000 compared to bespoke alternatives while achieving stunning results.
“The arched detailing completely transformed our living space. The effort invested created a custom piece that feels genuinely special and professionally made.”
Creating these curves requires careful measurement and cutting. Use MDF or wood to craft arched moulding for the top or sides of your unit.
Template guides ensure symmetrical curves and professional finishes. Take time to achieve smooth, even shapes that enhance the overall design.
This approach works particularly well for display areas at eye level. The arches draw attention to cherished items while softening the storage solution’s appearance.
Consider your colour scheme carefully when planning this update. Matching existing walls creates seamless integration while contrasting shades make the architectural detail pop.
This technique requires intermediate DIY skills and proper tools. Experience with drills and saws helps achieve clean, precise results that look professionally crafted.
Practice on scrap materials before working on your actual piece. This builds confidence and ensures you’re happy with your technique before committing.
The final result justifies the time investment completely. You’ll create a bespoke-looking furniture piece that elevates your entire room’s aesthetic.
This stylish update suits contemporary homes beautifully. The arched look remains popular across interior design trends for its timeless appeal.
Your transformed storage will become a conversation starter. Guests will admire the custom appearance without guessing its affordable origins.
Transforming Billy into Tableware and Display Storage
Glass-fronted cabinets offer the perfect solution for both storing and showcasing your favourite tableware. This approach combines practical organisation with beautiful presentation in one elegant piece.
Begin by selecting the appropriate units for your space. Consider the available height and width to ensure everything fits perfectly. The right foundation creates a stable base for your transformation.
Interior customisation makes all the difference to functionality. Install small rails for hanging mugs neatly along the shelves. Add discreet hooks for utensils to keep everything organised and accessible.
Yvonne Fisher demonstrated this beautifully in her home. She used Farrow & Ball’s Faded Terracotta paint with coordinating baskets from Argos.
“The warm terracotta tone complements our tableware perfectly. It creates a cohesive look that feels both rustic and refined.”
Consider your colour scheme carefully when planning this project. Earthy tones work wonderfully for rustic styles while brighter shades add contemporary flair.
Measure the interior space before purchasing organisers. This ensures everything fits without overcrowding. Leave enough room for items to be easily removed and replaced.
The benefits extend beyond mere appearance. Glass doors provide excellent dust protection while maintaining visibility. Your favourite pieces remain clean and ready for use.
This solution adapts beautifully as collections grow. You can rearrange interior elements to accommodate new additions. The flexibility makes it perfect for evolving needs.
Custom hardware elevates the basic cabinet to showpiece status. Choose handles that complement your room’s design aesthetic. This attention to detail creates a luxury feel.
Mixing open and closed storage creates visual interest. Some items can be proudly displayed while others remain discreetly organised.
The final result brings immense satisfaction. You create a personalised display solution that perfectly blends function with style.
Your transformed cabinet becomes both practical and beautiful. It showcases your tableware while keeping everything organised and accessible.
Final Tips for a Polished, Professional Result
The difference between an amateur attempt and professional-looking furniture often lies in those last thoughtful touches. Investing in quality materials makes all the difference to your final result.
Real wood trim and decorative hardware elevate the overall appearance dramatically. These elements add that custom feel everyone desires for their home.
“Measure twice, cut once remains the golden rule. Rushing leads to mistakes that compromise the entire project.”
Take your time during painting and assembly stages. Patience ensures smooth finishes and secure fittings that last for years.
Final touches transform good results into exceptional ones. Fill screw holes with matching wood filler for seamless surfaces.
Touch up paint on any scratches or imperfections. Check all elements are securely attached before declaring completion.
Evaluate your creation from different angles and lighting conditions. Natural light reveals details artificial lighting might miss.
Step back periodically to appreciate your progress. This helps spot areas needing minor adjustments.
Maintenance keeps your transformed piece looking fresh. Clean painted surfaces gently with soft cloths.
Tighten hardware periodically to maintain stability. These simple habits preserve your beautiful look.
Celebrate your achievement with friends and family. Share photos on social media to inspire others.
Even small details make significant impacts. Matching paint sheens creates cohesive appearances.
Perfectly aligned trim demonstrates careful craftsmanship. These elements combine to create professional results.
Your transformed storage solution will enhance your living space beautifully. It becomes a cherished feature of your room.
Following these tips ensures outstanding outcomes. You’ll create something truly special for your home.
Conclusion
Embrace the journey of transforming simple furniture into bespoke pieces that reflect your personality. These projects offer incredible value and versatility for any home.
You can create stunning storage that maximises space and style. The satisfaction of a DIY project adds personal pride to your décor.
Start with a simple idea that matches your skill level. Build confidence as you see your vision come to life.
Expert tips and real examples show what’s achievable. Your efforts result in durable, custom-looking furniture.
Explore further ideas or share your own creations for inspiration. We’d love to hear about your projects and answer any questions.
With some planning and creativity, you can achieve something special. Enjoy every step of your unique home transformation journey.
FAQ
What is the best way to ensure my bookcases look built-in?
For a seamless built-in appearance, it’s essential to secure your units to the wall and connect them to each other. Adding trim and moulding around the top, sides, and base helps to disguise any gaps and creates a custom, integrated look that fits your room perfectly.
Can I paint my Billy bookcase, and what is the best method?
Absolutely! The key is to start with a high-quality primer designed for laminate or melamine surfaces. This ensures the paint adheres properly and provides a durable finish. After priming, you can use your chosen paint colour, applying several thin coats for the best result.
What type of doors can I add for a more sophisticated style?
Glass doors are a fantastic choice for creating a more refined and elegant look. They allow you to display your favourite items while protecting them from dust. You can also update the standard handles with custom hardware to further personalise the piece and elevate its style.
How do I choose the right units for my project?
Consider the available space and your storage needs. Standard Billy bookcases come in different widths and heights. You can also mix and match units, such as combining a taller bookcase with a narrower one, to create a bespoke storage solution that fits your room’s dimensions.
What tools will I need for this kind of project?
You’ll need some basic tools like a drill, a level, and a saw for cutting trim. Essential supplies include wood filler, sandpaper, primer, paint, and your chosen decorative moulding. Having the right materials on hand makes the process much smoother.