Precise installation of cabinets is essential for both functionality and aesthetics in any home. A well-fitted cabinet not only enhances the look of your space but also ensures efficient use of storage. This guide will walk you through the process, from preparation to the final touches, ensuring a smooth and professional result.
Proper planning is key to saving time and avoiding mistakes. Following manufacturer guidelines ensures that your cabinets are securely fitted and aligned. Safety is also a priority, especially when handling power tools or lifting heavy units. This guide covers both base and wall cabinet techniques, making it a comprehensive resource for your project.
Key Takeaways
- Accurate installation improves both functionality and aesthetics.
- Planning ahead saves time and reduces errors.
- Always follow manufacturer guidelines for secure fitting.
- Safety is crucial when using power tools or lifting heavy cabinets.
- This guide includes techniques for both base and wall cabinets.
Introduction to Installing a Kitchen Cupboard
A well-organised layout is the foundation of a successful cabinet installation. Whether you’re working with base or wall units, understanding their standard sizes is essential. Most cabinets come in standard dimensions, making it easier to plan your space efficiently.
Creating a detailed plan on graph paper is a crucial step. This allows you to visualise the layout and ensure everything fits perfectly. Accurate measurements are key to avoiding costly mistakes during the project.
Safety should always be a priority. Before starting, disconnect power and water supplies to avoid accidents. This step is especially important if you’re removing old units or making structural changes.
Consider the typical workflow in your kitchen. Think about where appliances, sinks, and storage areas will be placed. This ensures your new cabinets enhance functionality as well as aesthetics.
You Might Also Like:


“Planning is the key to a smooth installation process. Take your time to measure twice and cut once.”
Finally, allocate enough time for the full installation process. Rushing can lead to errors, so plan for breaks and unexpected delays. A well-executed project will leave you with a beautifully organised space.
| Step | Details |
|---|---|
| Plan Layout | Use graph paper to sketch the design and ensure accurate placement. |
| Measure | Take precise measurements of the area and cabinet dimensions. |
| Disconnect Utilities | Turn off power and water supplies before starting work. |
| Consider Workflow | Think about the placement of appliances and storage for efficiency. |
| Allocate Time | Plan for the full installation process, including potential delays. |
Essential Tools for Installing a Kitchen Cupboard
Having the right tools is crucial for a seamless cabinet installation process. From ensuring precise alignment to securing units firmly, each tool plays a vital role in achieving a professional finish.
Spirit Level and Tape Measure
A spirit level is indispensable for checking alignment. It ensures your cabinets are perfectly horizontal or vertical, preventing uneven gaps or misalignment. Pair it with a tape measure for accurate dimensions, ensuring everything fits snugly in your space.
Drill and Screws
A reliable drill is essential for creating holes and securing cabinets. Use 15mm screws for a sturdy hold, especially when fixing units to walls. Masking tape can act as a depth guide on your drill bit, preventing over-drilling and potential damage.
Clamps and Brackets
Clamps are perfect for holding adjacent cabinets together during installation, ensuring they align perfectly. Brackets provide additional support, especially for wall units, keeping them securely in place.
Before drilling, always use a cable/pipe detector to avoid damaging hidden utilities. This simple step ensures safety and prevents costly repairs. With these tools and techniques, your installation process will be efficient and hassle-free.
Preparing Your Kitchen for Installation
Before fitting new cabinets, preparing your space is a critical step. Proper preparation ensures a smooth transition from old to new units, minimising potential issues. Start by clearing out the area and protecting floors and walls from damage during the process.
Removing Old Units
Carefully dismantle existing cabinets to avoid damaging the wall structure. Use safe demolition techniques, such as unscrewing rather than forcing units apart. This approach prevents unnecessary repairs and ensures a clean slate for your new installation.
Once the old units are removed, inspect the wall and floor for imperfections. Patch any holes or cracks and sand uneven surfaces. This step guarantees a smooth and level base for your new cabinets.
Disconnecting Power and Water Supplies
Safety is paramount during preparation. Disconnect power and water supplies to avoid accidents. This step is especially important if you’re removing units near electrical outlets or plumbing fixtures.
After disconnecting utilities, apply an initial coat of paint to the walls and ceilings. This not only improves the finish but also protects surfaces from dust and debris during installation.
| Step | Details |
|---|---|
| Clear Space | Remove furniture and protect floors to create a safe work area. |
| Remove Old Units | Use safe demolition techniques to avoid damaging walls. |
| Inspect and Repair | Patch holes and sand surfaces for a smooth base. |
| Disconnect Utilities | Turn off power and water supplies for safety. |
| Apply Initial Paint | Protect walls and ceilings with a first coat of paint. |
For more detailed guidance on preparing your kitchen, visit Ream’s guide or explore Avore Renovations’ step-by-step tips.
How to Install a Kitchen Cupboard: Step-by-Step Guide
Starting with accurate measurements ensures your cabinets fit perfectly and function seamlessly. Proper planning and execution are vital to achieving a professional finish. This section will guide you through marking, positioning, and securing your units for a flawless installation.
Marking the Wall for Installation
Begin by creating a horizontal line on the wall to serve as a guideline. Use a spirit level to ensure this line is perfectly straight. This step is crucial for aligning your cabinets correctly.
Measure the height of your units and mark the guideline accordingly. Double-check all measurements to avoid errors. A well-marked wall simplifies the positioning process and ensures everything fits as planned.
Positioning the Corner Units
Start with the corner units, as they act as anchor points for the entire layout. Align them with the horizontal guideline and use a spirit level to confirm they are perfectly straight.
Secure the corner units temporarily with clamps. This allows you to adjust their position before final fixing. Proper alignment at this stage ensures the rest of the installation proceeds smoothly.
Securing the Cabinets
Once positioned, drill pilot holes between hinge positions to avoid splitting the wood. Use cabinet connector bolts to join adjacent units securely. Angle screws downward for better accessibility and a firmer hold.
For added stability, position wall brackets strategically to distribute weight evenly. Tighten all screws firmly but avoid over-tightening, which could damage the units.
- Create horizontal guidelines to account for cabinet height.
- Use corner units as anchor points for the layout.
- Drill pilot holes between hinge positions for precision.
- Secure units with cabinet connector bolts and clamps.
- Position wall brackets for optimal weight distribution.
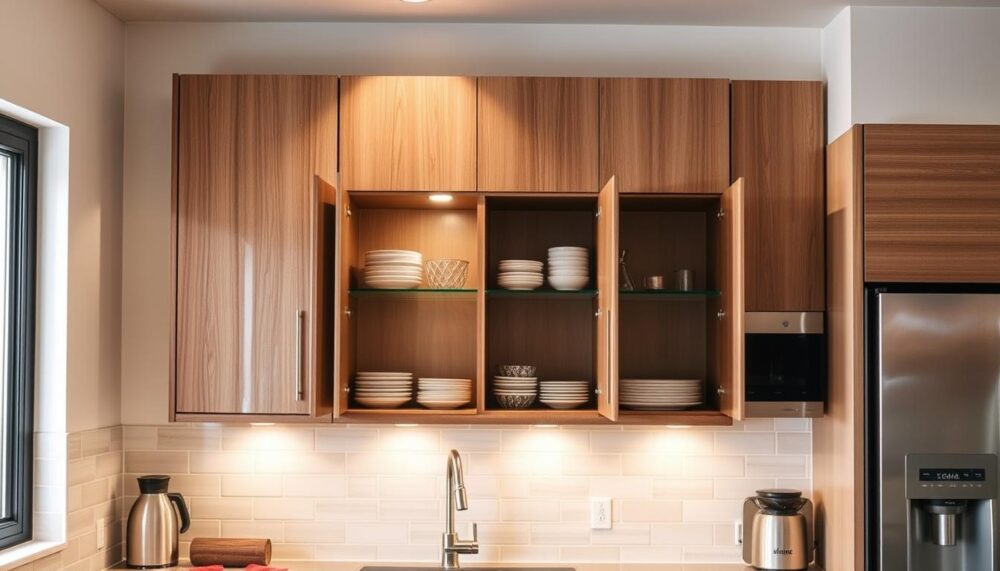
Installing Wall Cabinets
Wall cabinets are a practical addition to any kitchen, offering both storage and style. Proper installation ensures they are secure, level, and aligned with base units. This section will guide you through measuring, fixing brackets, and adjusting your cabinets for a professional finish.
Measuring and Marking for Wall Cabinets
Start by measuring the height and width of your space. Allow room for the worktop thickness to ensure a seamless fit. Use a spirit level to draw horizontal and vertical lines on the wall. These lines will act as guides for positioning your wall cabinets.
Double-check all measurements to avoid errors. Accurate marking is essential for alignment and stability. A well-planned layout ensures your cabinets fit perfectly and enhance the overall design.
Fixing Wall Brackets
Once the wall is marked, fix the brackets securely. The type of wall—plasterboard or brick—will determine the fixing method. Use appropriate screws and anchors to ensure the brackets can support the weight of the cabinets.
Position the brackets according to your markings. Ensure they are level and evenly spaced. Proper bracket placement is crucial for the stability of your wall cabinets.
Hooking and Adjusting Wall Cabinets
Carefully hook the cabinets onto the pre-fixed brackets. Use adjustment screws located in the top internal corners to fine-tune their position. This step ensures the cabinets are perfectly aligned and level.
Check the alignment with a spirit level across the cabinet faces. Make any necessary adjustments to achieve a seamless look. Once satisfied, tighten all screws to secure the cabinets in place.
| Step | Details |
|---|---|
| Measure and Mark | Use a spirit level to draw horizontal and vertical lines on the wall. |
| Fix Brackets | Secure brackets according to wall type, ensuring they are level and sturdy. |
| Hook Cabinets | Attach cabinets to brackets and adjust using screws in the top corners. |
| Check Alignment | Use a spirit level to ensure cabinets are perfectly aligned. |
| Secure Cabinets | Tighten all screws to finalise the installation. |
Adding Drawers and Doors
Adding drawers and cabinet doors transforms your storage space into a functional and stylish area. These elements not only enhance accessibility but also contribute to the overall aesthetic of your kitchen. Proper installation ensures smooth operation and longevity.

Installing Drawer Runners
Start by ensuring the drawer runners are perfectly parallel. Use a spirit level to check alignment, as even a slight tilt can affect functionality. Position the runners in place and secure them with screws, ensuring they are firmly attached.
For smooth operation, test the drawer after installation. Adjust the runners if necessary to eliminate any friction. Proper alignment guarantees effortless opening and closing, making your storage more efficient.
Fitting Cabinet Doors
When fitting cabinet doors, hinge alignment is crucial. Use a 90° try square to position the hinges accurately. Pre-drilled holes simplify this process, ensuring the doors sit flush with the frame.
Adjust the doors using a three-way adjustment system. This allows for side-to-side, up-down, and in-out adjustments, ensuring a perfect fit. Check the edge alignment and tighten the screws once everything is in place.
For a polished finish, consider adding soft-close mechanisms. These prevent slamming and add a touch of luxury to your cabinet doors. Troubleshoot any alignment issues by checking for debris or warped doors.
For more detailed tips on adding drawers to your cabinets, visit this guide.
Finishing Touches for a Professional Look
The final steps of cabinet installation are crucial for achieving a polished and professional finish. These details not only enhance the appearance but also ensure durability and functionality. From seamless caulking to meticulous cleaning, every step contributes to a flawless result.
Caulking and Trimming
Applying clear silicone caulking around the edges of your cabinets creates invisible seams. This technique prevents dirt accumulation and gives a seamless appearance. For a perfect finish, use a steady hand and smooth the caulk with a damp cloth.
Installing matching trim moulding around cabinet edges adds a refined touch. Use wood filler to cover any gaps or imperfections. This step ensures a cohesive look and protects the edges from wear and tear.
Cleaning and Organising
Before loading your cabinets, give them a thorough clean. Remove any dust or debris from the interior and exterior surfaces. This ensures your storage space is ready for use and maintains its pristine condition.
Consider adding an interior organisation system to maximise efficiency. Drawer dividers, shelf risers, and pull-out trays can transform your storage into a highly functional space. These additions make it easier to keep everything in its place.
Finally, remove any protective film from the surfaces and polish them for a gleaming finish. A final inspection for alignment issues ensures your cabinets are perfectly installed and ready for daily use.
“Attention to detail is what separates a good job from an expert one. Take your time with the finishing touches.”
- Use caulking techniques for invisible seams.
- Install matching trim moulding for a refined look.
- Clean thoroughly before loading cabinets.
- Add interior organisation systems for efficiency.
- Remove protective film and polish surfaces for a gleaming finish.
Conclusion
Completing your cabinet setup marks a significant milestone in enhancing your home’s functionality and style. From precise measurements to securing units, each step ensures a professional finish. This guide has walked you through the essentials, empowering you to tackle the project with confidence.
Maintaining your cabinets is key to their long-term durability. Regularly check hinges and runners for smooth operation. Consider complementary upgrades like modern lighting or stylish hardware to elevate your kitchen’s aesthetic.
Before wrapping up, perform a final safety check. Ensure all units are securely fixed and free from sharp edges. With these tips, your DIY achievement will stand the test of time, offering both practicality and elegance.
FAQ
What tools are essential for installing kitchen cabinets?
Key tools include a spirit level, tape measure, drill, screws, and clamps. These ensure accurate measurements, secure fittings, and stable placements.
How do I prepare my kitchen for cabinet installation?
Start by removing old units and disconnecting power and water supplies. Clear the workspace to avoid obstructions and ensure safety during the project.
What’s the best way to mark the wall for cabinet placement?
Use a tape measure and pencil to mark the height and position. A spirit level ensures the lines are straight, especially for wall cabinets and base units.
How do I secure corner cabinets properly?
Position the corner cabinet first, ensuring it’s level. Use brackets and screws to fix it to the wall, and double-check alignment before moving to the next unit.
What’s the process for installing wall cabinets?
Measure and mark the wall, fix wall brackets, and hook the cabinets onto them. Adjust the height and alignment using a spirit level for a seamless finish.
How do I fit cabinet doors and drawers?
Install drawer runners first, then attach the drawers. For doors, align the hinges and secure them with screws, ensuring they open and close smoothly.
What finishing touches give a professional look?
Apply caulk to seal gaps, trim edges neatly, and clean the surfaces. Organise the interior for a polished and functional result.