Adding a tile backsplash can completely transform the look of your kitchen, butler’s pantry, or even a home bar. It’s a simple yet impactful way to elevate your space with a touch of personality and style. Whether you’re a seasoned DIY enthusiast or a beginner, this project is accessible and rewarding.
With straightforward steps and budget-friendly options, you can achieve professional results in just four hours. For instance, reusing leftover tiles from a fireplace makeover can save costs while adding a unique touch. Tools like MusselBound adhesive and pre-mixed grout make the process even easier.
If you’re feeling unsure, Instagram story demonstrations can guide you through each step. This guide is designed to encourage you to take on the project with confidence, ensuring your kitchen looks stunning without breaking the bank.
Key Takeaways
- Transform your kitchen with a stylish tile backsplash.
- This project is beginner-friendly and budget-conscious.
- Reuse leftover tiles for a cost-effective solution.
- Complete the project in just four hours.
- Use tools like MusselBound adhesive for ease.
- Instagram demonstrations offer practical guidance.
- Achieve professional results with minimal effort.
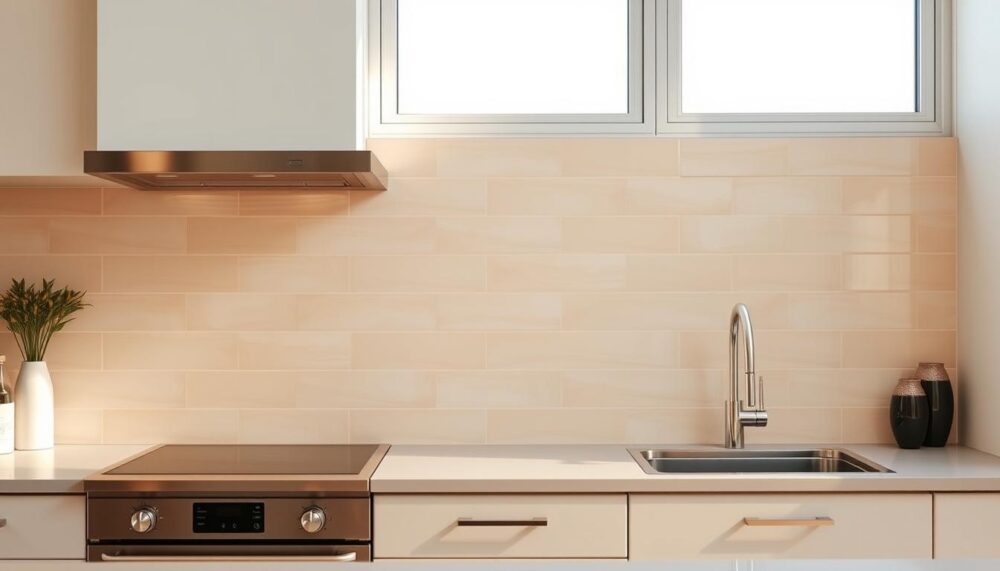
Why Install a Tile Backsplash in Your Kitchen?
Enhancing your kitchen with a stylish backsplash tile offers both practicality and charm. It’s a simple yet effective way to protect your walls from spills and splatters while adding a touch of elegance. Over 90% of UK homeowners prioritise kitchen upgrades, and a kitchen backsplash is a top choice for boosting property value.
One of the key benefits is its functional appeal. Backsplash tiles are moisture-resistant, easy to clean, and incredibly durable. Whether you’re dealing with cooking splashes or steam, they keep your walls looking pristine. This makes them an ideal choice for busy households.
From a design perspective, a backsplash tile can modernise outdated spaces. It creates a focal point, drawing the eye and adding character. Whether you prefer a sleek, minimalist look or a bold, patterned design, there’s a type to suit every style.
You Might Also Like:


Cost-effective options like peel-and-stick tiles or ceramic subway tiles make this project accessible for all budgets. For those seeking versatility, materials like marble, ceramic, and glass offer endless possibilities. Patterns such as stacked or herringbone can further elevate the aesthetic.
Here’s a quick comparison of popular materials for backsplash tiles:
| Material | Pros | Cons |
|---|---|---|
| Ceramic | Affordable, easy to clean | Less unique in design |
| Marble | Luxurious, timeless | Higher cost, requires sealing |
| Glass | Modern, reflects light | Can show fingerprints |
Investing in a kitchen backsplash is not just about aesthetics; it’s a practical decision with long-term benefits. With the right materials and design, you can transform your kitchen into a space that’s both functional and visually stunning.
Gather Your Tools and Materials
Proper preparation begins with assembling essential tools and supplies. Having everything ready ensures a smooth and efficient process. Whether you’re a DIY enthusiast or a beginner, this step is crucial for achieving professional results.
Essential Tools for the Job
Start by collecting the must-have tools. A tile cutter, either a wet saw or manual nippers, is necessary for precise cuts. A notched trowel helps spread adhesive evenly, while a level ensures your tiles are perfectly aligned.
Safety gear, such as goggles and gloves, is essential when handling sharp tools. A grout float and sponge are indispensable for finishing touches. Don’t forget a circuit tester to ensure electrical safety, especially when working near outlets.
Materials You’ll Need
For materials, consider using MusselBound adhesive mats for a hassle-free application. Alternatively, traditional thinset works well for those comfortable with mixing. Pre-mixed grout saves time and effort, while outlet extenders ensure a seamless finish around electrical fixtures.
Always buy 10% extra tiles to account for cuts and waste. TSP cleaner is ideal for preparing the wall surface, ensuring optimal adhesion.
| Adhesive Type | Pros | Cons |
|---|---|---|
| MusselBound Mats | Peel-and-stick, no mess | Higher cost |
| Traditional Thinset | Cost-effective, strong bond | Requires mixing and skill |
Pro Tip: When working with translucent glass tiles, use white adhesive to prevent discolouration. This ensures the tiles maintain their vibrant appearance.
Prepare the Kitchen Area for Installation
Getting your kitchen ready for a new feature requires careful planning. Start by clearing the workspace to ensure you have enough room to work efficiently. Remove any items from the countertop and nearby surfaces to avoid accidental damage.
Clear and Protect the Space
Use painter’s tape and plastic sheeting to protect cabinets and appliances. This step prevents scratches or stains during the installation. If your countertop isn’t level, consider using a ledger board to support the tiles.
Prepare the Wall Surface
Clean the wall thoroughly with a TSP solution to remove grease and dirt. Sand glossy surfaces to improve adhesion. Fill any holes or cracks with joint compound, then sand and prime the wall for a smooth finish.
Safety is paramount. Shut off power to the outlet and remove the cover plates before starting. Ventilate the area and wear a dust mask to protect yourself from particles. Always follow UK building regulations, especially when working near wet areas.
- Clear the workspace and protect surfaces.
- Clean and sand the wall for better adhesion.
- Use a ledger board if the countertop isn’t level.
- Follow safety guidelines and UK regulations.
Taking the time to prepare properly ensures a seamless and professional result. With these steps, your kitchen will be ready for the next phase of the project.
Plan Your Tile Layout
Planning your tile arrangement is a crucial step for achieving a polished finish. A well-thought-out layout ensures symmetry and avoids awkward cuts. Start by measuring the wall area to determine the number of tiles needed. This step saves time and reduces waste.
Measure and Mark the Area
Begin by finding the wall’s centre. Use a tape measure to mark reference lines horizontally and vertically. This helps visualise the layout and ensures balanced placement. A level is essential to keep everything straight.
For focal points like stoves or sinks, centre the tiles for a symmetrical design. Adjust the layout to hide cuts under cabinets or in less visible areas. This technique creates a seamless look.
Dry Lay the Tiles
Before applying adhesive, dry lay the tiles to check alignment. Use spacers (approximately 1.5mm) to maintain even gaps. This step allows you to make adjustments without committing to a permanent position.
Pay attention to expansion gaps, ensuring a minimum of 3mm to accommodate natural movement. Ignoring this can lead to cracks over time. A jury stick can help visualise vertical arrangements and avoid sliver cuts.
How to Install a Tile Backsplash in the Kitchen
Achieving a flawless finish begins with the correct application of adhesive and precise tile placement. This step ensures your tiles stay securely in place while maintaining a professional look. Whether you’re using traditional thinset or peel-and-stick mats, the process is straightforward with the right approach.
Apply Adhesive to the Wall
Start by selecting the right adhesive for your project. MusselBound mats are ideal for beginners, offering a mess-free, peel-and-stick solution. For those comfortable with mixing, traditional thinset provides a strong bond. Always follow the manufacturer instructions for the best results.
If using thinset, mix it to the correct consistency and apply it evenly with a notched trowel. Work in small sections, about 1m², to prevent the adhesive from drying too quickly. For peel-and-stick mats, ensure precise placement as repositioning isn’t possible.
Place the Tiles
Begin from the centre of the wall and work outward for a balanced layout. Use a level every 2-3 tiles to ensure straight alignment. The “twist and press” technique helps secure each tile firmly in place.
Maintain consistent 1.5mm gaps between tiles using spacers. This ensures even grout lines and a polished finish. Avoid uneven pressure or misaligned spacers, as these can lead to an uneven surface.
| Adhesive Method | Pros | Cons |
|---|---|---|
| MusselBound Mats | Easy to use, no mess | Higher cost, no repositioning |
| Traditional Thinset | Strong bond, cost-effective | Requires mixing, longer setup |
For more detailed guidance, check out this step-by-step guide. With patience and attention to detail, you’ll create a stunning backsplash that enhances your kitchen’s appeal.
Cut and Fit Tiles Around Obstacles
Cutting and fitting tiles around obstacles is a skill that ensures a polished and professional finish. Whether you’re working around outlets, pipes, or sinks, precision is key. With the right techniques and tools, you can achieve seamless results that elevate your project.

Measure and Mark Tiles for Cutting
Start by measuring the area around the obstacle. Use a cardboard template to trace the exact shape needed. This method ensures accuracy and reduces the risk of errors. Mark the lines clearly on the tile using a pencil or marker.
For intricate cuts, such as around a Belfast sink, take your time to ensure the measurements are precise. A well-measured cut tile will fit perfectly, enhancing the overall look of your backsplash.
Use the Right Tools for Cutting
Choosing the correct tile cutter is essential. Score-and-snap cutters are ideal for straight lines, while nippers work best for curves and detailed cuts. For mosaic sheets, secure them with painter’s tape before slicing to prevent shifting.
If you’re on a budget, consider renting a wet saw from a local DIY store. This type of tool is perfect for large projects and ensures clean, professional cuts.
- Always wear PPE, including goggles and gloves, to protect against dust and sharp edges.
- Ensure your tools are UK-compliant and certified for safety.
- Extend outlet boxes flush with the new tile surface for a seamless finish.
With these tips, you’ll master the art of cutting and fitting tiles around any obstacle, creating a stunning and functional backsplash.
Apply Grout and Finish the Backsplash
The final touches bring your project to life with precision and care. Grouting and sealing are essential steps to ensure your backsplash looks professional and lasts for years. With the right techniques and products, you can achieve a flawless finish that enhances your kitchen’s appeal.
Mix and Spread the Grout
Start by selecting the appropriate grout for your project. For gaps smaller than 3mm, use unsanded grout, while sanded grout is ideal for larger joints. Follow the manufacturer instructions for mixing ratios to ensure consistent colour and texture.
Apply the grout diagonally using a rubber float, pressing it firmly into the grout lines. Work in small sections to avoid drying out. After application, wait 10-15 minutes before wiping the surface with a damp sponge to remove excess grout.
Clean and Seal the Grout
Once the grout has dried, use a clean sponge to buff the surface and remove any haze. For long-term protection, apply a sealer like BAL Microseal Grout Sealer. This step prevents staining and makes maintenance easier.
Finally, use silicone sealer to fill gaps between the countertop and backsplash. Choose a colour that matches your grout for a seamless finish. With these steps, your backsplash will look stunning and remain durable for years to come.
Conclusion
Completing your kitchen transformation with a stylish backsplash is both rewarding and achievable. With careful planning, precision, and patience, you can achieve professional results that elevate your space. Remember, the key to success lies in attention to detail and taking your time.
Once your project is finished, share your results on social media to inspire others. Consider pairing your new kitchen backsplash with complementary upgrades like under-cabinet lighting or floating shelves for a cohesive look.
To maintain your backsplash, clean it gently with a mild detergent to preserve the grout colour. For a seamless finish, use paintable outlet covers that blend perfectly with your design. For more tips, check out this step-by-step guide.
FAQ
What tools are essential for installing a backsplash?
Essential tools include a notched trowel, tile cutter, spacers, grout float, and a sponge. These help ensure a smooth and professional finish.
How do I prepare the wall surface for tiling?
Clean the wall thoroughly to remove grease or dirt. Ensure it’s dry and smooth. If needed, sand uneven areas and apply a primer for better adhesion.
Should I dry lay the tiles before installing them?
Yes, dry laying helps visualise the layout and ensures tiles fit properly. It also allows adjustments before applying adhesive.
How do I cut tiles around outlets or obstacles?
Measure the area carefully and mark the tile. Use a tile cutter or wet saw for precise cuts. Always double-check measurements before cutting.
What’s the best way to apply grout?
Use a grout float to spread the mixture evenly over the tiles. Press it into the gaps, then wipe away excess with a damp sponge.
Do I need to seal the grout?
Yes, applying a grout sealer protects against stains and moisture. Follow the manufacturer’s instructions for the best results.
How long does it take to complete the project?
The time depends on the size of the area and your experience. Typically, it takes a day or two, including drying time for adhesive and grout.
Can I install a backsplash over existing tiles?
It’s possible, but ensure the surface is clean and stable. Use a high-quality adhesive designed for tiling over tiles.
What’s the ideal gap between the countertop and the first row of tiles?
Leave a small gap (about 2-3mm) to allow for expansion. Use spacers to maintain consistency.
How do I clean the tiles after installation?
Wipe the surface with a damp sponge to remove adhesive or grout residue. Avoid harsh chemicals that could damage the tiles.