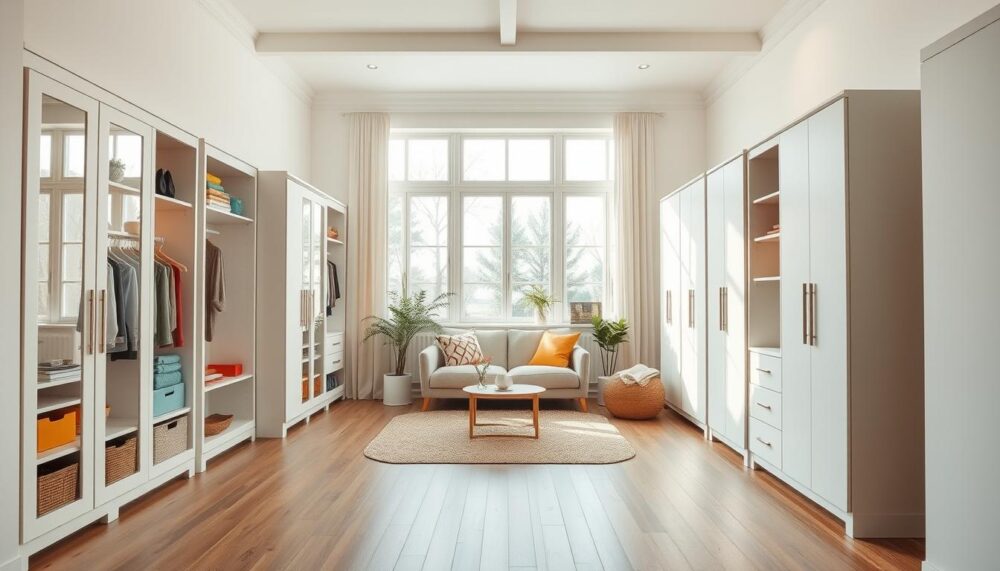
Are you tired of cluttered rooms and messy storage? Imagine creating a customised closet that fits your exact needs without breaking the bank. The IKEA PAX system offers incredible versatility for organising your home.
This popular solution comes in various sizes, colours, and interior configurations. You can personalise it to store clothes, accessories, and other items neatly. With a 10-year warranty covering frames and doors, it’s both durable and reliable.
Many people are discovering creative ways to enhance these units. Recent searches for PAX ideas have surged by 60% on Pinterest. This shows growing interest in affordable home improvements.
Planning your perfect storage might seem challenging at first. However, with some patience and creativity, you can achieve fantastic results. These clever modifications help you maximise every inch of available space.
Whether you prefer minimalist or bold styles, the possibilities are endless. You can add shelves, lighting, or decorative panels to suit your taste. This approach lets you create a high-end look for less.
For more inspiration on optimising small rooms, explore our guide on space-saving bedroom solutions. Discover how repurposing furniture can revolutionise your living area.
You Might Also Like:


Key Takeaways
- The PAX system offers extensive customisation options for personalised storage solutions.
- It features a 10-year warranty that covers essential components like frames and doors.
- These units provide a budget-friendly way to achieve a premium-looking closet.
- Popularity for DIY transformations has increased significantly on platforms like Pinterest.
- With thoughtful planning, you can create storage that perfectly matches your style and needs.
- Creative modifications can include added shelves, integrated lighting, or decorative elements.
- Anchoring units to walls ensures safety and stability in your space.
Introduction to IKEA PAX Wardrobe Potential
Transform your storage with a system designed for adaptability. The PAX range offers remarkable flexibility that goes beyond basic clothing storage.
Its modular nature means you can create solutions for any room in your home. From bedrooms to hallways, these units provide smart organisation.
Why the PAX system is ideal for customisation
Modular design stands as the cornerstone of PAX’s appeal. You can mix and match frames, doors, and interior configurations effortlessly.
This approach allows you to build storage that matches your exact requirements. Whether you need space for hanging clothes or storing accessories, the system adapts.
KOMPLEMENT organisers enhance functionality with adjustable shelves and drawers. These clever additions help maximise every inch of available space.
Speciality options exist for shoes, jewellery, and other accessories. Your closet becomes a perfectly tailored storage solution.
Budget-friendly benefits of IKEA hacks
Creating custom storage doesn’t require massive spending. PAX frames start at surprisingly affordable prices compared to built-in alternatives.
Simple modifications like painting doors or adding trim create dramatic transformations. These changes demand minimal effort but deliver maximum impact.
Content creators across social platforms showcase stunning PAX transformations.
“We achieved a luxury look for less than £500 using basic DIY skills”
This approach lets you achieve high-end aesthetics without custom cabinetry costs. Your budget stretches further while your space looks more expensive.
| Storage Solution | Average Cost | Customisation Level |
|---|---|---|
| Custom Built-in | £2,000-£5,000 | High |
| PAX System with Hacks | £300-£1,200 | High |
| Flat-pack Furniture | £100-£500 | Low |
Versatility extends beyond the bedroom. These units work perfectly in entryways, guest rooms, or even home offices.
Adding crown moulding or decorative panels creates that sought-after built-in look. The transformation appears seamless and professional.
Start with simple changes like new handles or interior lighting. These small updates deliver immediate satisfaction and encourage further customisation.
Ultimately, PAX modifications empower you to create storage that reflects your personal style. You achieve both organisation and aesthetic appeal on a sensible budget.
Planning Your IKEA PAX Wardrobe Layout
Getting your measurements right from the start makes all the difference. A well-planned layout ensures your storage solution fits perfectly and functions beautifully.
Careful planning saves both time and money down the line. You’ll avoid costly mistakes and create a closet that truly works for your needs.
Measuring your space accurately
Begin by measuring your room’s height and width precisely. Use a metal tape measure for the most accurate results.
Note any skirting boards, light switches or radiators that might affect placement. These details matter when positioning your units.
Record measurements in both metric and imperial units. The PAX system uses inches for its frame dimensions.
Using the PAX planner tool effectively
The online PAX planner lets you design your dream storage visually. This intuitive tool helps you experiment with different configurations.
Simply input your room dimensions and start dragging modules into place. You can try various combinations of frames, shelves and drawers.
The tool provides a final shopping list when you’re happy with your design. This makes purchasing exactly what you need wonderfully straightforward.
Considering room height and wall length
PAX frames come in two heights: 93 1/8 inches or 79 1/4 inches. Choose based on your ceiling height and door preferences.
Sliding doors need extra clearance – about 2 inches above the frame. Hinged doors require space to open fully into the room.
Wall length determines how many frames you can fit side by side. Available widths include 39 3/8, 19 5/8 and 29 1/2 inches.
Corner options provide clever solutions for awkward spaces. These bending units maximise storage in room corners.
They’re perfect for storing bulky items like suitcases or winter coats. This smart hack makes use of every available inch.
| Measurement Type | Key Considerations | Pro Tips |
|---|---|---|
| Room Height | Ceiling clearance for doors | Add 2″ extra for sliding mechanisms |
| Wall Length | Total span available | Mix frame widths for perfect fit |
| Corner Spaces | Angled wall placement | Ideal for bulky item storage |
| Door Swing | Clearance for opening | Hinged doors need full opening space |
Many people have successfully planned PAX systems for small rooms. One user created a functional closet in just 6.5 feet of width.
They used a combination of deep and shallow units to maximise space. The result was a perfectly organised storage area.
Take your time during the planning stage. A thoughtful approach ensures your finished wardrobe will be both practical and beautiful.
Choosing Your Wardrobe Configuration and Finishes
Your storage solution’s success begins with thoughtful configuration choices. The right combination of frames, doors and finishes creates both functionality and style.
This stage transforms basic components into your dream closet. Every decision contributes to the final look and usability.
Selecting frame sizes and corner options
The PAX system offers three widths and two heights for perfect customisation. You can mix 39 3/8, 19 5/8 and 29 1/2 inch frames to fit your space.
Corner units provide clever solutions for awkward areas. They maximise storage in room corners that often go unused.
These bending options are ideal for bulkier items like winter coats or suitcases. They make excellent use of every available inch.
Door style decisions: hinged versus sliding
Hinged doors need sufficient front space to open fully into the room. They offer classic appeal but require careful planning for clearance.
Sliding doors save space by operating on tracks at the top and bottom. They need ceiling height consideration but work beautifully in tighter areas.
You can choose aluminium frames with slot-in panels or solid door variants. Both options create different aesthetic effects in your space.
Finish and handle selections
Frame finishes include white, grey or beige to match your room’s decor. Lighter colours make spaces feel larger while darker tones add drama.
The standard handles are functional but basic. Swapping them for brass pulls or decorative styles creates a boutique hotel vibe.
Some enthusiasts combine different finishes and door styles for unique appearances. This approach delivers truly personalised storage solutions.
“We mixed white frames with oak-effect doors for a Scandinavian look that cost half the price of custom cabinetry”
For walk-in closets, consider leaving doors off entirely. This creates an open, accessible storage area that feels integrated with the room.
Always check hinge placements when planning lower sections with drawers. Proper alignment ensures smooth operation and avoids frustrating adjustments.
Your finish choices affect the overall aesthetic significantly. They help create that cohesive, built-in look everyone desires.
With thoughtful configuration, you achieve both organisation and beauty. The result reflects your personal style while meeting practical needs.
Maximising Storage with KOMPLEMENT Organisers
Unlock the full potential of your storage solution with clever interior organisation. The right fittings transform basic frames into perfectly tailored spaces for your belongings.
KOMPLEMENT organisers work seamlessly with the PAX system to create custom storage. They offer endless possibilities for arranging your interior layout exactly how you want it.

Adjustable shelving solutions
Adjustable shelves provide fantastic flexibility for your storage needs. You can reposition them as your requirements change over time.
Create high sections for handbags or low areas for shoes. The system adapts beautifully to different clothing types and accessories.
This approach makes excellent use of every available inch. Your closet becomes more efficient without requiring additional space.
Drawer systems and speciality storage
Drawer units offer tidy storage for folded clothes and smaller items. Choose between shallow or deep options based on what you need to store.
Speciality organisers include shoe racks and jewellery trays. These keep your accessories organised and easily accessible.
Pull-out trays provide clever solutions for smaller items. They make finding what you need wonderfully straightforward.
Pro tips for optimal organisation
Avoid placing drawers in the lowest section where door hinges might interfere. Mesh baskets work better here, offering visibility and ventilation.
Plan your interior layout using the online PAX planner tool. This ensures your organisers fit perfectly with your door choices.
Consider your daily routine when arranging items. Place frequently used pieces at eye level for convenience.
Space dividers and clothes rails help separate different categories. Create dedicated sections for workwear, casual clothes, and seasonal items.
“We created separate zones for shoes, accessories, and out-of-season clothing using these organisers – it transformed how we use our space”
The KOMPLEMENT range is designed specifically for PAX frames. Installation requires minimal effort and delivers maximum impact.
This approach helps you achieve premium organisation on a sensible budget. Your storage solution becomes both practical and beautiful.
Creating a Built-In Look with Moulding and Trim
Achieve that bespoke fitted appearance with clever trim additions to your storage solution. These techniques transform standard units into seamless room features that appear professionally installed.
With some basic DIY skills and patience, you can create premium-looking cabinetry. The results often surprise people with their professional finish.
Adding crown moulding for a premium finish
Crown moulding creates an elegant transition between your storage units and the ceiling. This detail makes the installation look custom-designed for your space.
Measure the perimeter of your closet carefully before purchasing materials. Attach the moulding using wood glue and finishing nails for secure placement.
Caulk all seams afterwards for a smooth, professional appearance. Choose styles that match your existing room trim for a cohesive look.
Installing baseboards and skirting
Baseboards cover the gap at the bottom of your units, integrating them with the room’s architecture. This simple addition makes a significant visual difference.
Ensure your storage solution is perfectly level before adding skirting. Use shims underneath if necessary to achieve proper alignment.
Match the skirting to your existing room features for consistency. This attention to detail completes the built-in illusion beautifully.
Filling gaps for seamless integration
Side gaps between units and walls can spoil the seamless appearance. Use wood strips or filler boards to create a flush finish.
Bondo or similar fillers work well for sealing seams and holes after trim installation. They create a smooth surface ready for painting.
These gap-filling techniques require patience but deliver outstanding results. The effort transforms functional storage into a room centrepiece.
“We used MDF trim and matching skirting to achieve a built-in effect that looks twice the price”
This approach significantly enhances your closet’s aesthetic appeal. It becomes a beautiful feature rather than just practical storage.
The transformation hides the flat-pack origins completely. Visitors will assume you invested in custom cabinetry.
With these techniques, you create luxurious-looking storage on a sensible budget. The results provide both satisfaction and increased functionality.
Transformative IKEA Wardrobe Hacks with Paint
A fresh coat of paint offers one of the most dramatic transformations for your storage units. This simple technique can elevate basic frames into stylish, custom-looking furniture that blends beautifully with your room’s decor.

Proper surface preparation ensures your paint job lasts for years. IKEA’s laminate surfaces require special attention before any colour application.
Proper preparation techniques for IKEA surfaces
Begin by thoroughly cleaning all surfaces with a degreasing solution. This removes any manufacturing residues that might prevent proper adhesion.
Lightly sand the entire frame with 120-grit sandpaper. This creates a slightly rough surface that helps primer grip better.
Wipe away all dust with a tack cloth before proceeding. Any remaining particles will affect your final finish.
Zinsser B-I-N shellac-based primer works perfectly on these prepared surfaces. Its unique formulation bonds exceptionally well with laminate materials.
Choosing the right primer and paint
Apply primer using a high-density foam roller for large flat areas. Use a brush for corners and detailed sections.
Two thin coats provide better coverage than one thick application. Allow proper drying time between layers.
For the top coat, select cabinetry-rated paints like Farrow & Ball Modern Eggshell. Benjamin Moore Advance also offers excellent durability for furniture projects.
These specialised formulations withstand daily use without chipping. They maintain their beautiful appearance for years.
Colour matching for cohesive room design
Consider matching your closet colour to existing wall shades. This creates a seamless, built-in appearance throughout the space.
Alternatively, choose contrasting colours for dramatic effect. Deep blues or greens add sophisticated moodiness to any room.
For a professional finish, consider using a spray gun application. Multiple thin coats provide the smoothest possible result.
Always work in a well-ventilated area and wear protective equipment. Proper masking protects surrounding surfaces from overspray.
“We achieved a Jenny Wolf-inspired closet using painted PAX units – the transformation cost less than £100 in materials”
Paint removable shelves and drawers separately for even coverage. This approach makes handling during the process much easier.
This budget-friendly hack delivers enormous visual impact with minimal financial investment. Your storage solution will look completely customised.
The right colour choice can make your entire room feel more cohesive and designed. It’s amazing what difference a simple paint job can make.
Customising Doors for Bespoke Appearance
The front of your storage solution makes the first impression. With some creative thinking, you can transform standard doors into designer features that elevate your entire space.
These modifications require minimal financial investment but deliver maximum visual impact. You’ll achieve that coveted custom-built look without the premium price tag.
Adding fluted or panelled finishes
Fluted MDF panels create beautiful ribbed textures on flat surfaces. These additions bring depth and character to otherwise plain doors.
Cut panels to size using a HYCHIKA jigsaw for precise results. Attach them with strong adhesive for a secure finish.
Paint your newly textured doors in rich heritage colours like olive green or charcoal blue. This combination creates a sophisticated, custom appearance.
Cane and rattan insert techniques
Cane webbing introduces natural texture and visual interest to your storage units. This material adds warmth while maintaining an airy feel.
Use your jigsaw to cut openings in door panels for the inserts. An AECCN staple gun securely attaches the cane webbing from behind.
This technique works beautifully with both painted and natural wood finishes. It creates that boutique hotel aesthetic everyone desires.
Swapping handles for boutique style
Standard handles often let down an otherwise beautiful storage solution. Replacing them makes an immediate difference to the overall look.
Choose unlacquered brass cup pulls from brands like Emtek for luxury appeal. These details elevate your closet’s aesthetic significantly.
Consider matching new handles with other metallic finishes in the room. This creates a cohesive, designed appearance throughout your space.
“Fluted panels and brass hardware transformed our PAX units into something that looks completely bespoke”
These door customisations work particularly well when combined. Try adding panels then painting, or mixing cane inserts with new handles.
Fluted and reeded designs remain on-trend for 2025 interiors. Your modifications will feel both current and timeless.
The required effort remains manageable for most DIY enthusiasts. Basic skills and patience deliver rewarding results that transform your storage’s aesthetic.
Materials like MDF and cane webbing prove surprisingly budget-friendly. This approach offers excellent value for money compared to custom alternatives.
Your finished closet will appear completely unrecognisable from its flat-pack origins. Visitors will assume you invested in professional cabinetry.
Focusing on door details creates that high-end, bespoke appearance everyone craves. It’s amazing how these small changes make such a significant difference.
Innovative Lighting Solutions for Your Wardrobe
Good lighting transforms your storage space from functional to fabulous. It makes finding your favourite outfits easier and adds a touch of luxury to your daily routine.
With clever lighting choices, you can create a bright, organised area that works beautifully. This simple upgrade makes a big difference to how you use your storage.

Motion-sensor lighting installation
Motion-sensor strip lights offer wonderful convenience for your storage area. They automatically turn on when you open the doors, illuminating your clothes and accessories instantly.
These lights typically use efficient LED technology, providing bright illumination while saving energy. Installation usually involves adhesive backing for easy placement along shelves or frames.
Many systems connect to a central power source hidden discreetly within the unit. This creates a clean, professional look without visible wires.
Recessed puck light techniques
Recessed puck lights provide focused illumination that looks built-in and sophisticated. You can install them into shelves using a router to create flush-fitting holes.
This technique requires some DIY skill but delivers excellent results. The lights sit perfectly level with the shelf surface, creating a seamless appearance.
Hardwired options connect to your home’s electrical system for permanent operation. Battery-powered versions offer easier installation but need occasional battery changes.
Hardwiring versus battery options
Hardwired lighting connects directly to your electrical system through proper wiring. This permanent solution provides reliable operation without battery maintenance.
Extension cords help connect multiple units when hardwiring your lighting system. Always conceal wires behind shelves or within cable channels for safety and aesthetics.
Battery-operated lights offer simpler installation with no electrical work required. They’re perfect for rental properties or those uncomfortable with wiring projects.
LED options provide excellent energy efficiency with long lifespans. They’re sustainable choices that keep running costs low while delivering bright illumination.
“We installed recessed LED puck lights in our PAX system – the transformation made finding clothes so much easier, especially during early mornings”
Place lights at the top of your storage units to avoid casting shadows on your belongings. This positioning ensures even illumination throughout the interior space.
Consider combining different lighting types for optimal results. Strip lights work well for general illumination while puck lights highlight specific areas.
This lighting upgrade enhances functionality while adding that custom look everyone desires. It’s a relatively simple project that delivers impressive visual impact.
For more detailed guidance on electrical modifications, explore our comprehensive guide on built-in wardrobe transformations. Discover professional techniques for achieving seamless integrated lighting.
Advanced Customisation: Drawer Fronts and Details
Fine-tuning your storage units with custom details elevates them from functional to fabulous. These finishing touches create that seamless, built-in appearance everyone desires.
With some careful attention to drawer fronts, hanging rods, and interior finishes, you achieve a truly bespoke look. The transformation appears completely professional and custom-designed.
Creating custom drawer fronts
Standard drawer fronts often reveal the modular origins of your storage solution. Replacing them with custom panels creates that high-end, integrated appearance.
Use half-inch poplar board cut precisely to size with an eighth-inch gap allowance. Sand surfaces thoroughly before painting for a smooth, professional finish.
Attach your new fronts using screws and washers from inside the drawer compartment. This technique ensures perfect flush alignment with surrounding trim.
Consider flat or shaker-style designs based on your preference. Flat fronts offer a streamlined look that’s easier to achieve.
“Custom drawer fronts were the final touch that made our PAX system look completely bespoke – visitors assume we spent thousands”
Wooden rod replacements
Standard metal hanging rods can look functional rather than beautiful. Swapping them for stained wooden alternatives adds warmth and character.
Choose hardwood rods stained to match other wood elements in your room. Products like Rubio Monocoat Oil provide durable, beautiful finishes.
This simple change enhances visual cohesion throughout your space. It introduces natural texture that feels both luxurious and inviting.
Wooden rods feel pleasant to touch and last for years. They’re a small detail that makes a big difference to daily use.
Plugging unused shelving holes
The characteristic hole patterns inside units can reveal their flat-pack origins. Filling unused holes creates a smooth, seamless interior appearance.
Use affordable plug packs available from various retailers. These small plastic inserts fit perfectly into standard shelving holes.
This quick fix takes minimal effort but delivers maximum visual impact. Your storage interior looks clean and custom-finished.
It’s one of those small details that contributes significantly to the overall aesthetic. The transformation appears thoughtful and complete.
| Customisation Detail | Materials Required | Skill Level | Time Investment |
|---|---|---|---|
| Custom Drawer Fronts | Poplar board, screws, washers | Intermediate | 2-3 hours |
| Wooden Rod Replacement | Hardwood rod, stain, brackets | Beginner | 1 hour |
| Hole Plugging | Plastic plug pack | Beginner | 30 minutes |
These advanced techniques require patience but deliver outstanding results. Take your time measuring and fitting each component precisely.
Use a laser level when installing drawer fronts to ensure perfect alignment. Small washers help adjust flushness with surrounding surfaces.
The effort transforms your storage solution into something that looks completely custom-designed. It’s amazing how these details eliminate the modular look.
Your finished closet will appear sophisticated and seamlessly integrated. These touches make all the difference between standard and spectacular.
Wallpaper and Decorative Accents
Personalise your closet’s interior with creative wallpaper applications that add depth and character. This approach transforms functional storage into a design feature that reflects your personal style.
Using leftover materials makes this an incredibly budget-friendly project. You achieve maximum visual impact with minimal financial investment.
Using wallpaper for interior backing
Apply wallpaper to the back walls of your storage units to conceal MDF seams beautifully. This technique adds both colour and texture to your closet interior.
The application process requires careful measurement and cutting for perfect results. Use strong adhesive to attach the paper smoothly without bubbles.
Choose paintable options for ultimate flexibility in your design scheme. This allows you to match the wallpaper to your unit’s colour after installation.
Adding texture with grasscloth
Grasscloth wallpaper offers excellent thickness for hiding construction seams effectively. Its natural texture creates visual interest behind your clothes and accessories.
When painted, grasscloth blends seamlessly with the surrounding frame for a custom look. This material adds luxury without the premium price tag.
Flitch stylists particularly recommend textured options like linen effects. These create tactile surfaces that feel both sophisticated and inviting.
Pattern incorporation techniques
Use leftover wallpaper from other projects to create cohesive design themes throughout your home. Bold patterns make dramatic statements behind open shelves.
Subtle textures provide understated elegance that complements your storage system. Either approach transforms plain interiors into designed spaces.
This hack works perfectly for renters or those avoiding permanent modifications. It offers non-permanent elevation of your closet’s appearance.
“Wallpaper adds instant luxury to PAX interiors – especially textural varieties that create depth behind displayed items”
Combine wallpaper applications with other transformations like painting or lighting. This creates a fully coordinated look that feels completely bespoke.
The effort required remains minimal compared to the dramatic results achieved. With some patience and creativity, you can create magazine-worthy storage solutions.
This approach proves particularly effective for concealing the modular nature of flat-pack furniture. Your finished closet will appear seamlessly integrated and professionally designed.
Conclusion: Bringing Your Vision to Life
Your journey to a personalised closet starts with imagination and the right system. The PAX range offers incredible flexibility for crafting storage that fits your exact needs.
Simple changes like new doors or interior lights create a custom look without the high cost. These clever modifications help you organise clothes and accessories beautifully.
Remember to plan carefully and use quality materials. Your effort will reward you with a space that’s both functional and stylish.
Share your creations and inspire others. Your dream closet is within reach!
FAQ
What makes the PAX system so suitable for customisation?
The PAX system’s modular design allows you to mix and match frame sizes, doors, and interior organisers. This flexibility means you can create a configuration that perfectly fits your space and storage needs, making it an ideal base for personalisation.
How can I ensure my PAX units look built-in rather than freestanding?
To achieve a seamless, built-in appearance, add crown moulding along the top to meet the ceiling and install skirting boards along the base. Filling any gaps between units and walls with trim also helps create a custom, integrated look.
Can I paint my PAX wardrobe, and what’s the best way to do it?
Yes, you can paint your PAX units for a bespoke finish. Start by lightly sanding the surface, then apply a primer designed for laminate or melamine. Use a high-quality paint in your chosen colour, applying thin, even coats for a professional result.
What lighting options work well inside a wardrobe?
Motion-sensor LED strips or puck lights are popular choices. They can be battery-operated for easy installation or hardwired for a more permanent solution. Placing lights above shelves or along hanging rails ensures your clothes are well-lit and easy to see.
Are there creative ways to upgrade the doors on my PAX wardrobe?
Absolutely! You can add fluted or rattan panels to plain doors for texture, or even attach moulding to create a panelled effect. Swapping standard handles for more decorative hardware can also instantly elevate the overall style.
How do I make the most of the interior storage space?
Use KOMPLEMENT organisers like adjustable shelves, pull-out trays, and shoe racks. Consider your daily routine—installing drawers for folded items and double hanging rails for shorter garments can maximise every inch of available space.